First off, whether or not prints are more archival than your art, the option of selling your prints has its benefits. There is always a risk of the original painting getting damaged. You also need to consider that sometimes things can go wrong often by accident or by experiment during the actual process of painting. Also, whether you are selling the art as a print or not, taking a professional photo of it and saving a printable image could last forever (as long as we've got technology). And sometimes, the archival quality of the prints may actually be in better shape than the original to begin with...
Consider the damage. If something were to ever happen to a painting from water damage, poor storage, transferring, or even a fire, you might kick yourself for not capturing the image in a photo to begin with. It's not the end of the world, but it meant something to you and could have meant something more to someone else.
Consider the condition. During the process of painting, how are you preparing your art? Did you cover the entire canvas with Gesso before using oils? Did you wait in between sessions to allow enough drying for your paint? Did you do a water color painting on a random piece of drawing paper? If you painted on Watercolor paper, will the paper eventually yellow? Did you experiment with different glazes without doing the research of possibilities of cracking, discoloration, and fading that could happen later on down the road? I have always been experimental myself, learning many lessons along the way. Now that I consider these things after experiencing all of the above, I am more careful and considerate. But I can never be too sure.
Consider the presentation. How do you want others to view your work? Personally, I prefer people to enjoy the originals of my oils and acrylic paintings. However, I tend to like the look of my watercolors printed. As much as I love watercolors, I don't are for the end look on paper and I'd rather see it on something like canvas. If your work is printable, there are a variety of materials to print your work on.
So, in some cases, yes perhaps prints are more archival, but there is nothing like looking at an original painting. However, we can still be inspired by prints. Needless to say, it doesn't hurt to take a professional photo of your work. Save a high quality file of your image for keepsake, your portfolio and possibly selling prints. You just never know what could happen to the original.
If you're interested in selling prints, there are so many places now that will do the dirty work for you. That's right, all you have to do is upload your work. I upload high quality prints of my work at Fine Art America. Check it out if you haven't yet.
My Prints
Wednesday, February 16, 2011
Sunday, February 13, 2011
Please stay tuned for the Winners of my Valentine's Art Contest
The votes are in! The winners are:
3rd place: Dolly Mohr
2nd place: Harry Mason
1st place: Arvind T Akki
I will be posting their images as well as some information about the artists as soon as they reach me. So stay tuned!
Code Technorati:
5BBFAXPPXRPB
3rd place: Dolly Mohr
2nd place: Harry Mason
1st place: Arvind T Akki
I will be posting their images as well as some information about the artists as soon as they reach me. So stay tuned!
Code Technorati:
5BBFAXPPXRPB
Painters, Try This for a Palette
For years I've used the most typical painter's palette board to mix my paints-- you know, the ones with the thumb hole so that you can hold your pallet as you work. Or maybe just a big piece of Masonite board (also known as "hardboard" sold at your local hardware store). But most recently I have found it more efficient to use stretched canvases to mix my paints on. Why? Read on.
If you buy store-bought canvases from your local art store, which I so often do when I am on a time limit to get a painting done, you may notice that if you hold the canvas up to the light that it is somewhat translucent. This isn't necessarily a good thing. The white gesso (primer) that has already been painted on for you is meant to be a strong base that is going to help add body and strength to the painting. It also gives you a stiffer and more durable surface when you are applying heavy elements. Some painters put 5 coats of gesso on before they start their painting. The store bought canvases typically apply the thinnest coats of gesso, probably to save on money. When you paint a picture on these canvases without considering the durability, it can be really tacky when someone holds your painting up and sees that light is getting through the canvas. I learned this the hard way when I entered a show where the paintings were on glass windows instead of walls. What I'm getting to is that it doesn't hurt to prepare your store bought canvas with another coat of gesso or paint before you begin a painting on it.
SO why not build up your canvas this way: Start mixing your color pallet on a store-bought stretched canvas or one that you have already stretched and gessoed yourself. Ultimately, you will be able to use this canvas again later on down the road. Use it as a pallet until you have covered all of the white gesso base. Hold it up to the light and see how translucent your base painting is now. This can add a lot of texture to your n=base as well as some great under-paint that can add a whole different feel and quality to your next painting. If there are just too many colors for you and it is feels too busy as a base, then just paint over it with one solid color. Now you've got a really strong base that is ready to be painted on. Or maybe, you enjoy all of the different colors on your pallet and your palette might just work as a decorative painting for your house. I've got one of mine hanging up in the bathroom.
Sometimes I use old paintings that I just don't care for as a palette board. I take a picture of the painting for keepsake and then I cover the ugly thing up with rich colors. Eventually, this too will be used as a base to a new painting. Also, if you're not one to paint on canvases and prefer wood or hardboard, it doesn't hurt to use it as a pallet first either.
Here I have my palette standing upright. This works sometimes, depending on the consistency of the paint. This palette is in the process of covering up an old painting I didn't care for.
If you buy store-bought canvases from your local art store, which I so often do when I am on a time limit to get a painting done, you may notice that if you hold the canvas up to the light that it is somewhat translucent. This isn't necessarily a good thing. The white gesso (primer) that has already been painted on for you is meant to be a strong base that is going to help add body and strength to the painting. It also gives you a stiffer and more durable surface when you are applying heavy elements. Some painters put 5 coats of gesso on before they start their painting. The store bought canvases typically apply the thinnest coats of gesso, probably to save on money. When you paint a picture on these canvases without considering the durability, it can be really tacky when someone holds your painting up and sees that light is getting through the canvas. I learned this the hard way when I entered a show where the paintings were on glass windows instead of walls. What I'm getting to is that it doesn't hurt to prepare your store bought canvas with another coat of gesso or paint before you begin a painting on it.
SO why not build up your canvas this way: Start mixing your color pallet on a store-bought stretched canvas or one that you have already stretched and gessoed yourself. Ultimately, you will be able to use this canvas again later on down the road. Use it as a pallet until you have covered all of the white gesso base. Hold it up to the light and see how translucent your base painting is now. This can add a lot of texture to your n=base as well as some great under-paint that can add a whole different feel and quality to your next painting. If there are just too many colors for you and it is feels too busy as a base, then just paint over it with one solid color. Now you've got a really strong base that is ready to be painted on. Or maybe, you enjoy all of the different colors on your pallet and your palette might just work as a decorative painting for your house. I've got one of mine hanging up in the bathroom.
Sometimes I use old paintings that I just don't care for as a palette board. I take a picture of the painting for keepsake and then I cover the ugly thing up with rich colors. Eventually, this too will be used as a base to a new painting. Also, if you're not one to paint on canvases and prefer wood or hardboard, it doesn't hurt to use it as a pallet first either.

Here I have my palette standing upright. This works sometimes, depending on the consistency of the paint. This palette is in the process of covering up an old painting I didn't care for.
Wednesday, February 9, 2011
Capturing Paintings in Progress
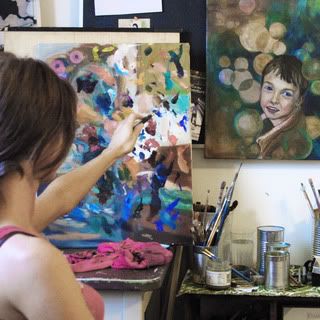
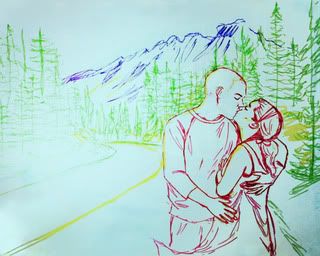
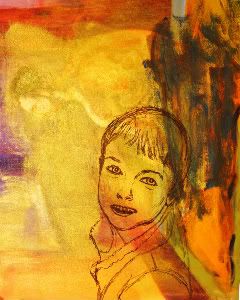
In the past two years I find myself more interested in documenting the progress of my paintings, because I have begun to appreciate the process as a journey that it worth reflecting back on. To me the underpainting, or the work in progress, can often stand alone just as strong as the finished painting. Most recently, I started taking professional photos of the work in progress to sell as prints. There is an entirely different feel to the work in the first sessions in my work, often appearing more sketchy and illustrative than the finished image. Some people might actually prefer this style over the finished look.
So, why bother finishing the painting if it seems to be at a finished state already? Sometimes it is fun to do quick paintings that have a loose feel to them, but often times I enjoy spending time with my oils and really getting detailed in my conceptual portrait paintings. Usually I have a vision of how I want the final product to look and the work in progress is usually a pleasant surprise that I run into along the way. I’ll be honest, sometimes I want to just be done, but once I have spent time mixing up a colorful pallet of oils, the show must go on. In other words, I have to continue the painting because I have a strong desire to paint the figure and capture all of the colors in someone’s face. To me, the skin tones can be the most challenging but also the most rewarding. I like to emphasize the subtle colors in one’s face that we don’t always notice. For example, your shirt may be lightly reflecting onto your jaw line, so I might enhance those colors to create more relationships between the colors throughout the painting. So all in all, following through with the original plans of a painting is often the route I like to choose and documenting the process can also tell a story about how I got there.
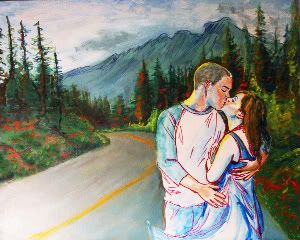
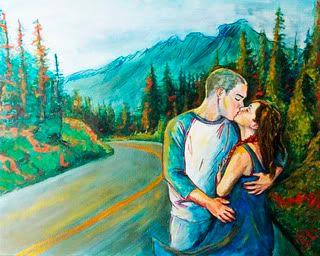
Here is one example of some sessions I did on a commissioned painting for a couple:
This is my most recent documented work that I am just finishing up on. First i sketched out the boy on an old painting of mine that I didn't care for.


So, why bother finishing the painting if it seems to be at a finished state already? Sometimes it is fun to do quick paintings that have a loose feel to them, but often times I enjoy spending time with my oils and really getting detailed in my conceptual portrait paintings. Usually I have a vision of how I want the final product to look and the work in progress is usually a pleasant surprise that I run into along the way. I’ll be honest, sometimes I want to just be done, but once I have spent time mixing up a colorful pallet of oils, the show must go on. In other words, I have to continue the painting because I have a strong desire to paint the figure and capture all of the colors in someone’s face. To me, the skin tones can be the most challenging but also the most rewarding. I like to emphasize the subtle colors in one’s face that we don’t always notice. For example, your shirt may be lightly reflecting onto your jaw line, so I might enhance those colors to create more relationships between the colors throughout the painting. So all in all, following through with the original plans of a painting is often the route I like to choose and documenting the process can also tell a story about how I got there.
Here is one example of some sessions I did on a commissioned painting for a couple:


This is my most recent documented work that I am just finishing up on. First i sketched out the boy on an old painting of mine that I didn't care for.


Saturday, January 29, 2011
VALENTINE ART CONTEST !
Hello people. I love some good creative Valentine art. Check out my link below to find out the details of the contest to see if you'd like to take part in it. If not, stay tuned and you can help vote. Thanks!
http://fineartamerica.com/contests/a-valentine-for-a-special-someone.html?tab=overview
http://fineartamerica.com/contests/a-valentine-for-a-special-someone.html?tab=overview
Sunday, January 16, 2011
Interior Walls: Painting the Edges Freehanded
Someone recently asked me how I paint my edges so crisp where the wall meets the ceiling or trim. I thought I'd share with you all, since I think nearly anyone is capable of it. Since I have a lot of experience painting interior walls of homes, I figured out a technique where I no longer need to use a straight edge or tape. If the condition of a house isn't perfect and there are layers of old paint or sagging of old ceilings, a straight edge is useless and tape is just a pain. I also don't like that you can't see the end result right away when using tape. Here is my approach at painting the edges with brushes. I hope this is helpful.
First off, I have several brushes at hand. I posted links of images below that will help you understand what kind of brushes I use. For really old and rough edges, I often use a small square topped artist brush with soft bristles, about an inch in length (See the orange-ish colored square topped brushes in the photos to the following links).
Variety Pack Artist Brushes
More Variety Pack Artist Brushes
Sometimes I have to use an even smaller size, all depending depends on what I am dealing with. I like to get a package of a variety of sizes like the package below(similar in size of what people use to paint in water color) and get them relatively cheep in the painting section at art stores like AC Moore. For a newer home in decent condition, I will probably use a brush from somewhere like Home Depot that is professionally cut and tapered at the edges (See the links below for samples). It is still good to get a package of those variety brushes for details.
Painters Brushes
More Painters Brushes
When dipping the paint, you only want to dip your brush in about an inch or less, scraping any excess paint off before putting it to the wall. Sometimes it helps to angle the brush so that the ends of the bristles press closely to where the wall and ceiling meet, like the way you hold a dust pan when you are trying to sweep the last bit of crumbs onto the pan. As for corners, I just get in there with one those little art brushes.
Okay so if you are really working with some rough edges or you are having trouble painting neat because your hand is shakey while holding the brush, and you are not seeing an even look when you step back, here's one more tip but you must be careful when doing it. This is particularly good for where the wall meets the ceiling. Take a small flat brush from the art brush package. You can use a rounded top brush if you'd like. Dip the brush with a thin layer of paint and just lay it right in on the edges where the ceiling and wall meet. Pull the brush along the edge and allow for a very small amount of paint to get on the ceiling edge as you pull the brush along. Yes, you are going to get paint on some of the ceiling, but I'm talking like a milimeter (about the width of a pennie) and no more than say 3 milimeters. The harder you press the brush the more you will get on the ceiling, so try to avoid that. This trick seems to hide a lot of the flaws in where the wall meets the ceiling.
Let me know if this was helpful. Thanks for tuning in!
~Angelique
Subscribe to:
Comments (Atom)