Sunday, December 16, 2012

My Studio Space Renovated For My Students

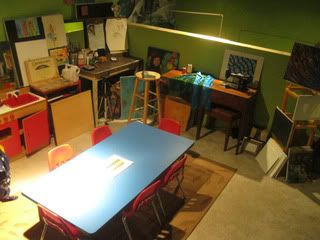
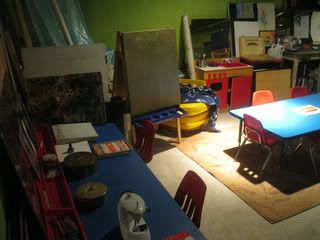
Over the summer, I made some room in my studio to make it kid friendly, so that I could teach fine art to them.  Recently, an additional room was added so that I have more personal space.  Below is one corner of the room for my students.  To see more images, go to the link below.  As soon as I get my space cleaned up, I'll post the area that I do my own work in.  This has been such a great addition for the kids to really embrace and appreciate the arts.


To see more photos of this new space, you can visit my blog specifically for my little fine art students:

Saturday, November 24, 2012

Photographs Digitally Altered


"Break Away"
This image is available to purchase in prints here:  My Artist Website

This image started as a photograph--a motion shot that I took of a neighbor running back to her house in a new dress that someone recently made for her.  I caught her in the moment and something about it reminded me of Cinderella or Alice in Wonderland, so I spent a few hours in photoshop and here’s what I came up with.  

Now to break it down step by step:

For those who are familiar with photoshop and are just curious about my approach, needless to say, it was very experimental.  I started off by making a quick selection of the girl running and then fine tuning it.  I inversed the image and then began working on covering the car and street with the clone tool.  I realize this is considered an old fashioned technique now, but I enjoy having some control over the placement of things as I copied and pasted parts of the grass and trees. I used the softest brush option with about 90 percent opacity/flow and made my placements with a path in mind.  Then I used the soft brush and a low opacity to paint a path (taking the color from a light area in the trees).  I used a textured brush and added some spots alongside the path to create flowers.  Finally, I added some lighting effects (go to Filter; Render; Lighting effects) and used a default spotlight, angling it on my path.  I added a lens flare (also found under Render) that started behind the trees, and voila.  Of course, I did lots of experiments before choosing the final route.  I played with the colors through different adjustment layers and I changed the textures of the girl’s surroundings with different filters.  I know this is all in a nutshell, so if you have any specific questions, please feel free to ask and I’ll do my best to answer.  

Here is the image before I made the path. 

I toyed around with colors before I decided on the final image.  I was debating on the path looking more like fog.  What do you think?

Sunday, August 26, 2012

Tips on Painting Interior Murals & Decorative Wall Art for Beginners


This year at the school where I teach, I was moved into a new classroom that has been neglected of interior decorating.  So before school started, I began working on small decorative murals to create a cozy and welcoming environment.  I did not want to make things too busy, so I chose to paint calm and peaceful imagery like trees, ponds and fish.  I will post the finish product as soon as I get the opportunity.  It was a really great experience and a nice change from the kind of work I do in the studio.  If you are interested in painting murals, but have never done it before, I have some tips for beginners after the following images.
Trees are great for beginners since there are so many styles that you can get away with, you can be inventive and you don't have to get terribly detailed to make a statement.  This wall is in the cleaning area of the studio.
I painted some very basic decorative art in the children's wash station.

If you are a painter but have never experienced painting murals and you are interested, just go for it!  You can always paint over something with some interior paint if you mess up, no biggy.  My tips are in no particular order and if you are lost on anything, please ask questions.

TIPS FOR STARTERS:
  • Collect interior wall paints that you have used in your own home as they work great as a base for any painting, especially to fill big spaces up like tree trunks, water and sky scenes.  
  • Buy small sample paints of fun colors you want to experiment wtih at your local home improvement retailer store.  These little samples go a long way.  For example, you can do washes to help the paint to cover large areas.  If you don't want to wait for an employee to mix the colors for you, some paint brands like Martha and Valspar sell cute little samples to experiment with.  Here is a link to show what you should look for.Paint Samples  
  • Save large brushes that you use for interior/exterior painting, even if they are beat up.  Old brushes can be good to create texture in bushes, flower patches in a distance, etc.
  • You may want to start small and simple in case you realize that it is more time consuming than you thought (which has happened to me too many times-- I never learn!)
  • Surf the web and google images of interior wall art, modern art, and decorative art ideas if you don't know where to begin.
  • Sketch designs on paper and/or start drawing directly on the wall with a light colored pencil.  If you mess up, don't worry about the pencil marks until later. I don't use led pencils for this part, because I have run into certain paints or washes that seem to have a harder time covering up pencil lines, but typically it's not a big deal if you are drawing lightly.
  • Have rags handy as it may be the best tool for blending paints.  Rags work good for washes and textures.  Old t-shirts, jeans, anything with texture (as long as it is not a material that contains too much fuzz or lint that could come off onto the wall while you are painting, and if you aren't sure test it out first).  You can dip a rag in water, ring it out and dip a little into the interior wall paint to create a nice base wash that could represent clouds, water, sky, or just to add some depth to a wall.  You might want to rub in random circular motions for clouds, bunch up and dab areas to create bushes or rocky textures, and wipe horizontally to create a soft sky.  Have a dry rag handy to wipe away any areas where the paint looks too thick. You may also want to use a sponge or a frayed paint brush to create different textures.  
  • Do not spend much time in any area when making washes and using interior/exterior paint as it will only start to get muddy.  Try to only spend a few seconds everywhere your brush/rag touches.  If you aren't terribly happy with how things are looking and it's not wiping away, WAIT for it to dry before tampering with it again.
  •  Once you have your base colors down, I find that smaller art brushes and acrylic paint works well for details on interior walls.  I usually do not use my oils since they take much longer to dry, and they may not work well on top of other paints or wall surfaces.
  • Fill the entire wall with the most basic shapes and colors before getting detailed.  In other words, keep things simple until the end, and if you feel that it needs more detail, go back.  Otherwise, if you get too detailed right off the bat, you might realize that you don't have the time or energy to get detailed in other areas.  A wall might  not look very big at first glance, but once you start working on it, you will realize that this could get very time consuming.  Unless you are going for a realistic look, a nice modern appeal is to keep things simple and painterly.

I hope this helps.  If you have more questions, just ask!


Everyone liked my classroom much that I was asked to paint a mural in another classroom.  I was happy to do so.

Wednesday, June 6, 2012

Later this Month, Classes Will Start in My New Studio!!

I'm so excited to have more space to offer in my art studio, as well as more storage.

This summer, I will be teaching ages 3-9 the fundamentals of painting and drawing by encouraging originality and creativity.  My students will get many opportunities to mimic famous artists as we study art history and explore famous art.  Many of them will also be learning how to sew with needle and thread as well as basic techniques on the sewing machine to create pouches, purses, pillows, or whatever inspires them.  My lesson plans also include many educational lessons that will help build fine motor skills to strengthen their writing abilities and coordination.

Last but not least, my students, the "Little Wonders of Wonderland," will be selling their art work on a new website I have recently launched.  http://little-wonders-of-wonderland.artistwebsites.com/

I will be posting updates and photos very soon so stay tuned!!!

Thursday, April 26, 2012

Studio Renovation

My art studio is expanding!  Literally, a wall is being removed to open into another room that will give me 3 times as much space than I already had!  Now that I am teaching small groups of children, I will definitely be able to allow more children to visit when the space is finished.

Pictures coming soon!

Wednesday, February 15, 2012

Thank You Friends, For Your Support!!!

Dear Friends who recently purchased art from my website,

I appreciate you so much as you have helped me get a little bit higher in search engines. It takes a lot of work for me to advertise and keep active in the art community on the internet and in my own area, and every little bit of support helps. You are ultimately the ones who help me to get noticed. I have been spending countless hours lately trying to work on my art and advertising, and I am just so thankful when it pays off.

Again, I wish I could thank you all personally, and if I see you I certainly will.

Hugs, love, success and happiness to my customers!

For those of you just dropping by, it's not too late to purchase my art with the discount I posted in my last blog. You can click on my website in the right hand column.

Sunday, January 29, 2012

My Current Studio Space: Now Kid Friendly!

Photobucket
I've been sharing a cozy loft space for a studio with fine artist Shabnam Nassir, here in Durham, NC for nearly a year now. It is unique, because it is located up a steep stairwell in the corner of a large school playroom for children ages 3-6. I have been teaching at this school for about two years and only recently did I get the idea of teaching small group fine art lessons up in my studio. I toyed with the idea for a while, since I was nervous about having the children around my paints and other dangerous material, but I did some reorganizing, brought some child-sized tables into the mix, and started making lesson plans for this age group. I figured, what better way to teach fine art than to do it in a real live art studio?

The children absolutely love this new addition to their program. They know that in order to be invited to my studio, they have to earn studio time by being on good behavior during regular school hours. I explain to them that I need to know that they can be trusted in my personal space. For ages 3-6, these children take this offer very seriously and show great respect while I am giving a lesson in my studio. I am having so much fun sharing my space with them, and I think it has opened their eyes to a whole different perspective on what art can offer.

Photobucket

That's all for now, but stay tuned as I am working on a website for my students to sell prints of their work in order to raise money for more art supplies for the children (All profits will absolutely go back into the program). Thanks for tuning in!


As a loyal Artist of the Fine Art America organization, I like to sponsor a page every so often.
Here are some links to check out artwork from some of the artists at Fine Art America (FAA) Enjoy! female prints photography digital art

Wednesday, January 18, 2012

My Studio Space Back in PA at 1505 Art Works, Downtown Erie

Photobucket
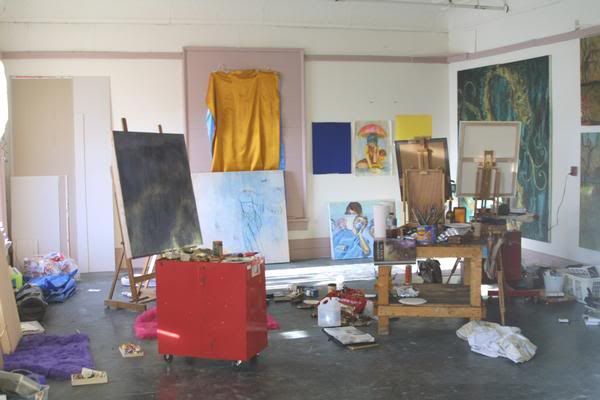
After sharing a space with my brother Eric (see previous post), I moved into a bigger space with fine artist, Kirsten Bole. Kirsten is an extremely active artist who likes to paint big and bold on large wooden canvases that she builds herself. Sharing space with Kirsten was motivating for me as she always had something new in her head that she needed to get out through paint. My time painting next to Kirsten was always an experience; Kirsten was loud and expressive, had full of energy, and loved to share random stories about her life. I miss her bad-ass attitude and great sense of humor! Below is an image of our shared space. The two really large canvases are Kirsten's.


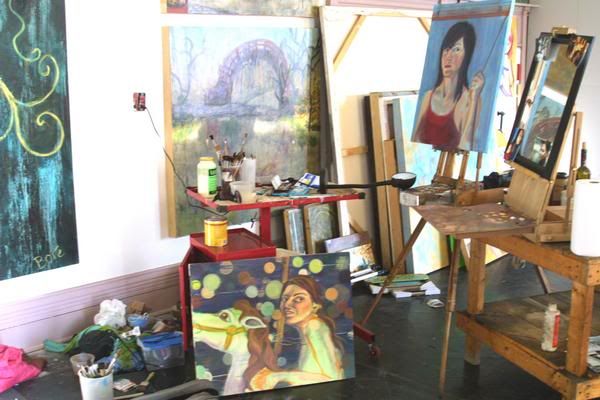
This was a really unique and large space in an old building dedicated to Artists in Erie, PA. Here is another angle of the room. You can usually tell our art apart pretty easily. Hers are big and painterly while mine are portraits in smaller scale.

Photobucket

This was a few years back in Erie, PA.

Currently I share a studio space with Shabnam Nassir, a beautiful fine artist from Iran. I will post images of our studio in a blog very soon.

In the meantime, I'll give you a sneak peak of Shabnam's style. If you want to see more, just click on the image:
Art Prints

Needless to say, sharing studio space has always been well worth it for me. It's a constant reminder to keep making and creating, because with a studio mate, you have each other to share praise, ideas, input and constructive criticism.

Monday, January 16, 2012

My First Shared Studio Space

A personal story about sharing studio space with my brother.

For the past 4 years or so, I have shared a studio space with other artists. When creating art, I am the kind of person who gets into a zone to a point where one might honestly believe that I don't need anyone else but me and my creation. However, in all actuality, the presence of others means the world to me while I am creating. It keeps me motivated to be around those who are creating and being productive. And when I say that, I don't just mean being around a fine artist, but any type of person who is inspired to create, experiment, and learn. True, I will get into my own zone, but the comfort of knowing that others are around and working their brains keeps me focused.

My first studio space outside of my own home was shared with my brother Eric Buman and his good friend Mark Graziano, both musicians and recording artist in Erie, Pennsylvania. In one room, I was painting and in the other, Eric and Mark were recording new musicians. We seemed to feed off of each other as we spent hours on end just hanging out and being productive. I certainly have a new respect for recording, and vise versa. Every musician who stopped in to get a recording by Eric and Mark would drop in and see what I was creating, always intrigued and interested in the way that we shared the studio space. It certainly was unique, I must say. Sometimes, it felt like a party, and sometimes it was a party... in a productive sort of way. All in all, we stayed busy and inspired.

Although this time in my life was short lived, it truly was very special. It was the first time in my life that I had a window into my brother's world, and vise versa. Even though my brother Eric and I probably spent most of our time doing our own thing, there was a new understanding and connection between us that was never there before. It was a time for growing together as we began to understand and respect each other for what we loved. Needless to say, I never really got close to any of Eric's friends until I met Mark. Prior to our studio time together, I was an outsider to my brother's world and sometimes his friends appeared young and disrespectful. But here I could clearly see that Mark adored Eric, believed in him, and together they stayed productive. I loved that Mark loved my brother, and he helped me to see the strengths in Eric. I never felt as close to my brother Eric as I did while sharing studio space together. It was during this time that we built a new love and trust for each other.

It is hard for me to find the words to explain, but I believe there is something about making art in some form or another around others that can bring you to a different level of understanding others. It's been years since I had the opportunity to share a studio space with Eric, but a connection was built and I believe it will always be there.

I miss you, Eric. I love you so much and I'm so proud of all that you've done. I hope someday we get an opportunity to share productive time together again. Hugs and love.

Readers, I realize this post was more for my brother than anyone, but hopefully I have inspired someone to be productive around someone you love.

Below is a link to one of my favorite paintings I painted back when I was sharing a studio space with Eric:
Photography Prints

I love fashion illustration. To view more fashionable art, check out the artists here at Fine Art America:
fashion art

Sunday, January 1, 2012

2012 New Years Art Talk Resolutions

Happy New Years, Readers! May your new year be happy, healthy and productive!

Last year I accomplished a lot, but I also got behind on things like updating my blogs and websites. This year, I hope to stay in better touch and share fresh new stories, information and art.

So where have I been and what have I been up to all of this time? A lot of school and work. I decided to go back to school after all, long after I said I'd never go back when I finished up my Fine Arts degree back in 2005. I am almost done with my schooling as I study to get my Montessori degree for ages 3-6. I have been working in a Montessori school as an assistant and fell in love with the original and creative way of teaching that I had to go ahead and learn more. It's been a lot of work, and I hardly have time to do my own art, though I often think about ideas and creations I want to get into.

As I finish up my Montessori training in these next couple of months, I should start having more time to start creating again. It's something I need to do this year. I want to make more time to create. I also want to make more time for dance, as I love hoop dance and other styles that have branched off of that.

And I don't know for sure if it will happen, but I am definitely going to look into being a home owner very soon. That way I can get creative in my own home, not feel bad about it, and make additions to suit my needs. I think it would definitely allow me to get even more artistic.

So all that said, the above are some of my New Years Art Talk Resolutions. Please write about yours if you are willing to share! Let's make this new year colorful and special!

Sincerely,
Angeique